Create windows 11 vm
The following page describes how to create a Windows 11 VM using Proxmox. While this is a general guide to setting up a Windows 11 VM, I've made callouts in areas where considerations can be made based on your setup and end goal. Performed using Proxmox 8.4.
1. Download the windows 11 iso
- Go to the Windows 11 downloads page
- Scroll down to the "Downloads Windows 11 Disk Image (ISO) for x64 devices" section
- From the "Select Download" drop-down, select "Windows 11 (multi-edition ISO for x64 devices)
- Click "Confirm"
- Select the desired product language
- Click "Confirm"
- Click "64-Bit Download"
2. Download virtio drivers iso
- Go to the Proxmox wiki on Windows VirtIO Drivers
- Use the link under the "Using the ISO" section to download the latest stable drivers
3. Upload iso to proxmox
- Log in to the Proxmox Virtual Environment web-console
- Navigate to
4. Create a VM for windows
To begin creating the Windows VM, right-click on the PVE host, then select "Create VM". The following sections will guide you through the Proxmox VM configuration options.
4.1 General
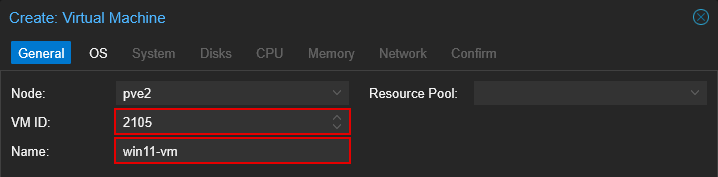
- Fill in "VM ID"
- Fill in "Name"
4.2 OS
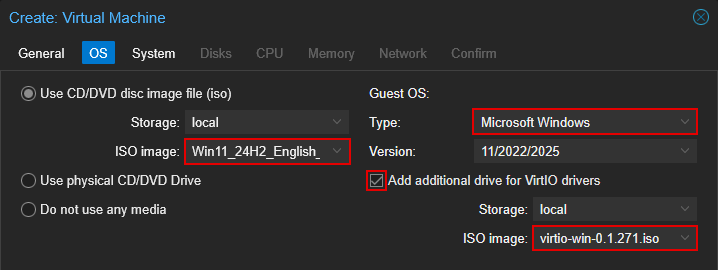
- For ISO Image, select the Windows 11 ISO
- For Guest OS Type, select "Microsoft Windows"
- Check "Add additional drive for VirtIO drivers"
- For the ISO image, select the virtio drivers iso
4.3 System
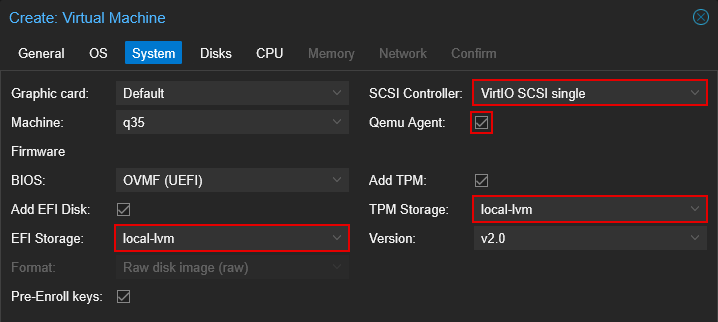
-
Set "SCSI Controller" to "VirtIO SCSI Single"
VirtIO SCSI vs. VirtIO SCSI Single
When using a single disk, VirtIO SCSI and VirtIO SCSI Single will perform identically. The difference begins to matter when you attach multiple disks and enable IOThreads (in the next step). Standard SCSI assigns one controller for up to 16 disks, while SCSI Single gives each disk its own controller. Enabling IOThreads assigns one thread per SCSI controller. This means you get the best performance using SCSI Single with IOThreads. However, keep in mind to ensure your Proxmox host has enough compute resources to handle all the controllers and threads used across all VMs.
-
Enable "Qemu Agent"
- Set "EFI Storage" to the appropriate storage device. Typically set to the same storage device as your primary disk, as described in the next section.
- Set "TPM Storage" to the appropriate storage device. Typically set to the same storage device as your primary disk, as described in the next section.
4.4 Disks
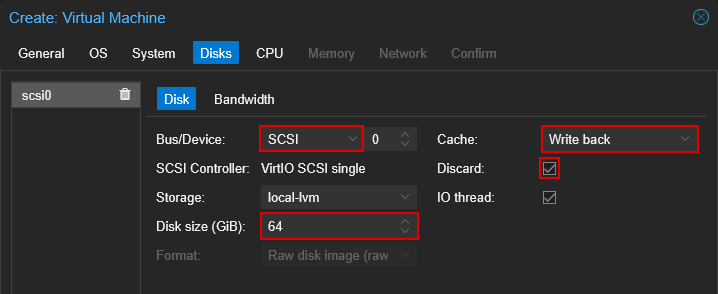
- Set "Bus/Device" to SCSI
- (Optional) Set the storage location for the disk. You may want to do this if you've set up another storage location with Ceph or ZFS. Note: Ensure the EFI and TPM storage locations in the previous step match this location.
- Set desired disk size. Windows 11 requires at least 64GB.
-
Set "Cache" to "Write back"
Write back vs. No cache
The best caching option depends on your specific setup and workload. User-published benchmarks (see the grafts sections) show that VirtIO with Write Back often provides the best performance for random reads and writes, while sequential workloads can benefit from No Cache or Direct Sync.
Keep in mind that Write Back improves performance by caching disk writes in RAM, but this comes with a higher risk of data loss if the host loses power before the data is flushed to disk. To mitigate this risk, ensure your host is connected to a UPS.
-
Enable "Discard". This option allows the guest to mark formerly used disk space as unused.
4.5 CPU
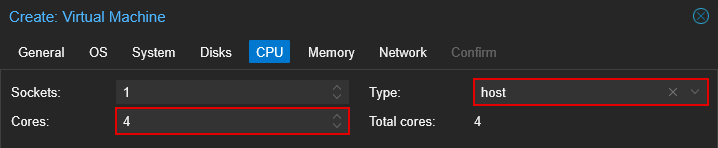
- Set desired cores
- (Optionally) Set CPU "Type"
Does CPU type matter?
In short, yes. Each generation of processor introduces new features (such as AVX/AVX2, MMX, and AES), and the QEMU agent can emulate many of these different features. Two of the most common CPU types are kvm64 (the default) and host. kvm64 exposes a limited set of features for maximum compatibility, while host passes through all of the host CPU's features directly to the VM.
For most single-node setups, or if you don't plan to use live migration, setting the CPU type to host is a good starting point as it allows the VM to utilize the host CPU's capabilities fully and can improve performance depending on the workloads. host also supports nested virtualization (if your CPU supports it) for use with Hypervisor or WSL. Keep in mind, though, that VMs with nesting enabled cannot be live-migrated.
However, suppose you're running a cluster with mixed CPU models and plan to use live migration. In that case, it's recommended to choose a CPU type compatible with the oldest processor in your cluster to ensure stability. Ultimately, there is no universal best choice; instead, it is what suits your workload and environment.
4.6 Memory
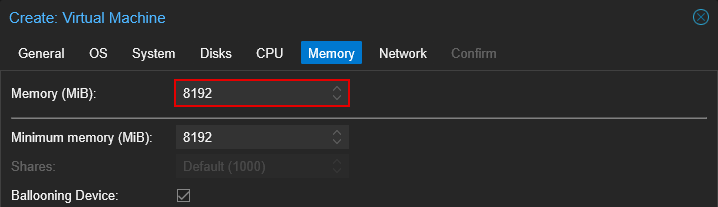
- Set memory amount
- (Optional) Set Minimum memory amount (under advanced settings).
Memory Ballooning
Proxmox enables memory ballooning by default. To utilize this feature, enable "Ballooning Device" and set the minimum memory to the OS's or the intended application's baseline requirement. For Windows 11, that's 4 GB. Keep in mind that memory ballooning can introduce a slight performance impact, but it only activates when the host's total memory usage exceeds 80%.
4.7 Network
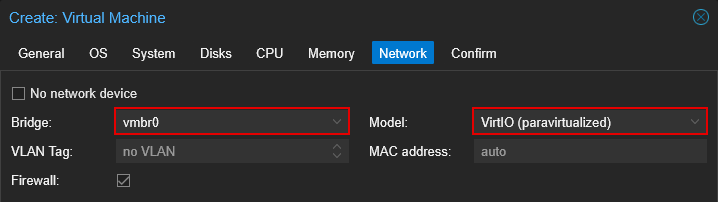
- Set "Bridge" to "vmbr1"
- Set "Model" to "VirtIO (paravirtualized)"
4.8 Confirm
Before clicking "Finish", ensure that "Start after created" is unchecked to avoid any issues when booting for the first time.
5. Install windows 11 to vm
The installation of Windows on a Proxmox VM is very similar to installing it on bare metal. This section will not cover the entire Windows 11 installation, but rather focus on a few key points during the process.
5.1 Start installation
- Log into the Proxmox web console
- Go to the Windows VM's Console
- Click "Start Now"
- Proceed with the onscreen instructions until you get to the Windows installation location, then follow the steps in the next section
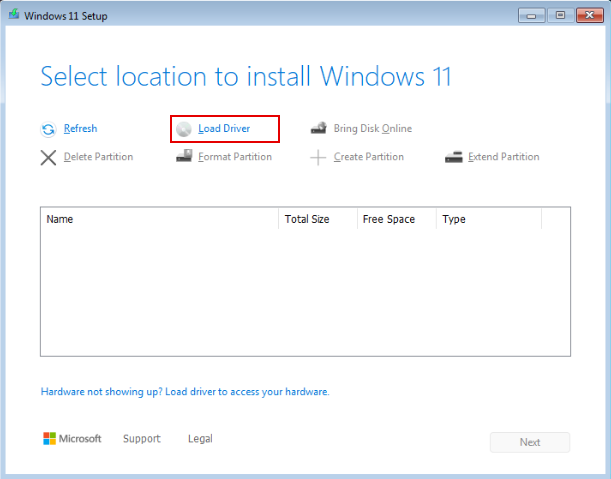
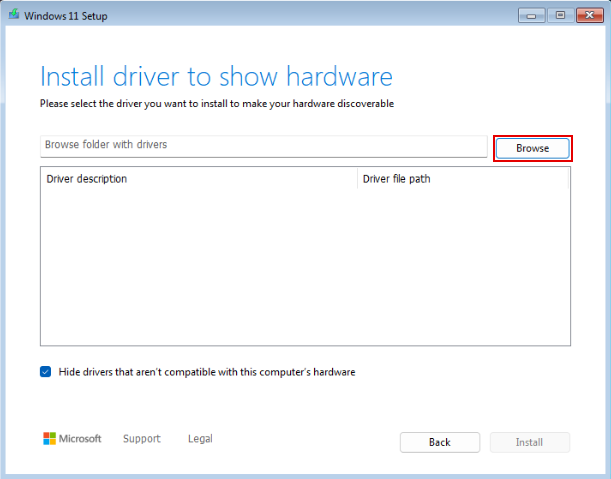
5.2 Selection location to install windows
When you reach the selection of which disk to install Windows on, you'll notice that no disk is listed, even though a virtual disk was assigned to the VM. Follow the steps below to install the VirtIO SCSI drivers, which enable communication with the virtual disk.
-
Click "Load Driver"
-
Click "Browse"
-
Select the appropriate storage VirtIO SCSI drivers
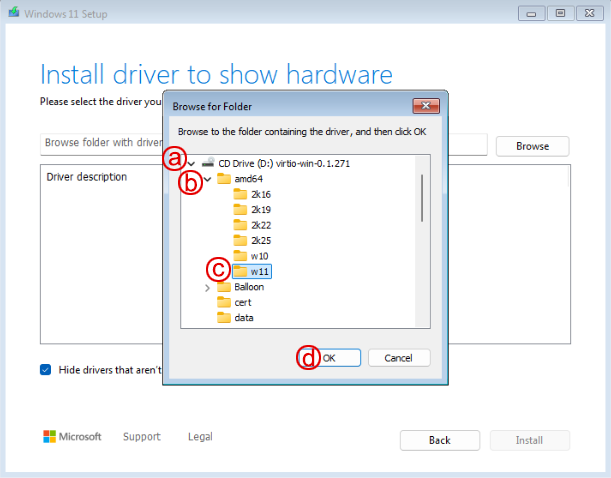
a. expand the virtio Windows drivers disk
b. expand theamd64directory
c. select thew11directory
d. click "OK" -
Install Red Hat VirtIO VirtIO SCSI drivers
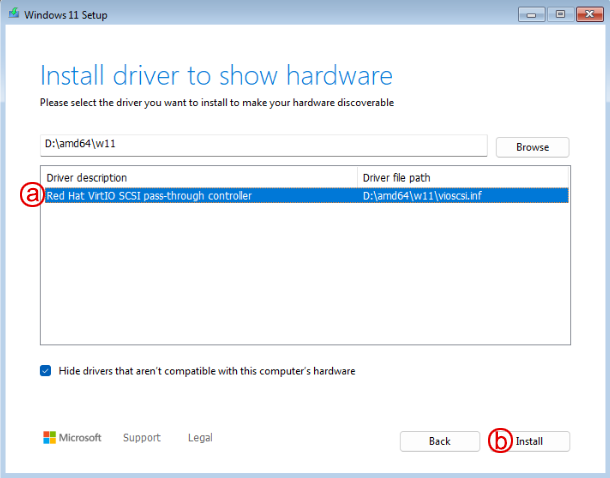
a. select the "Red Hat VirtIO SCSI pass-through controller" b. click "Install"
After the SCSI controller is installed, you should now see your disk listed for Windows installation.
-
Install Windows to the drive
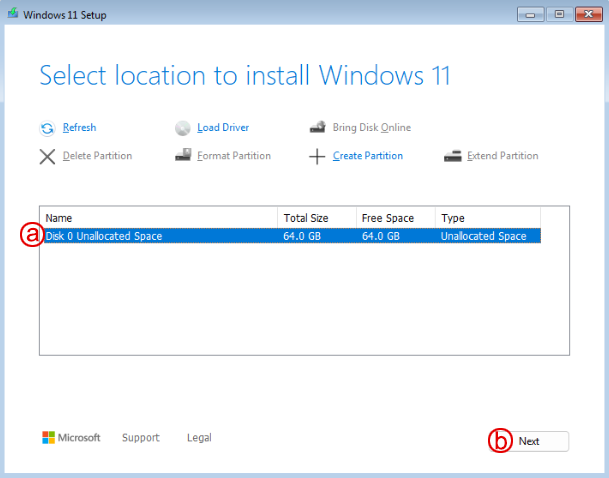
a. select the disk
b. click "Next" -
Proceed with the onscreen instructions until you get to the network, then follow the steps in the next section
5.3 Connect to a network
Similar to the previous steps, you'll notice there is no network to connect to. Follow the steps below to install the remaining VirtIO drivers, which include the Network driver.
-
Press
shift + f10to bring up the Terminal.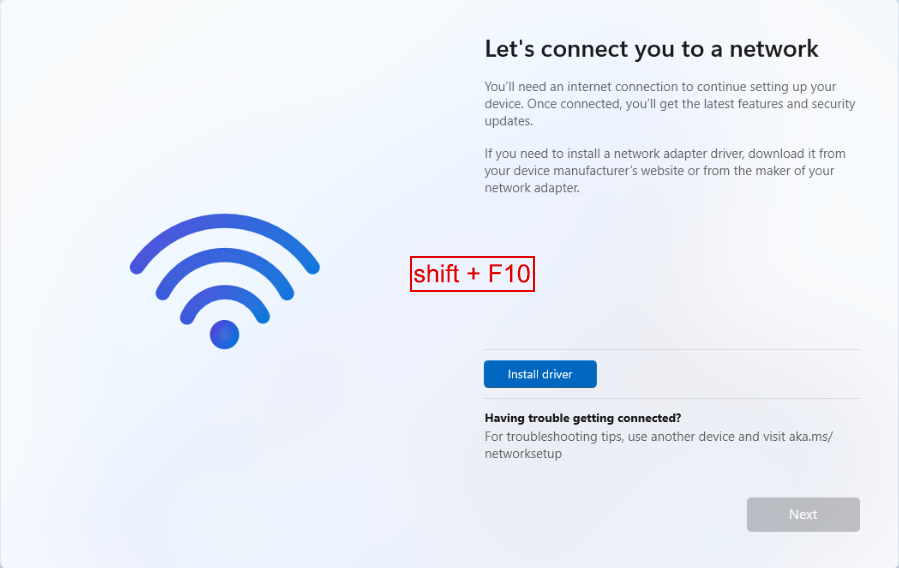
-
Install VirtIO drivers
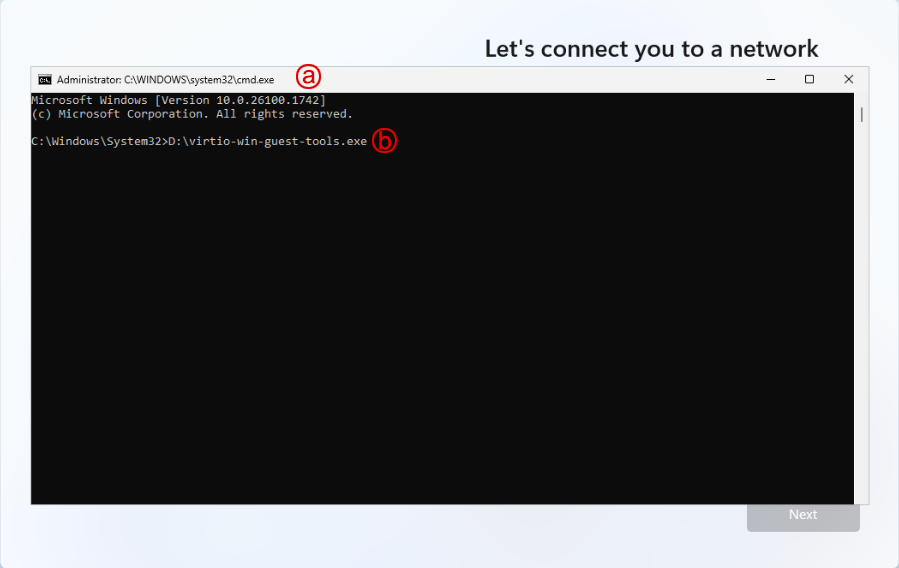
a. click the Terminal window to bring it into focus
b. Enter the following command, then press the Enter key -
Proceed through driver install (defaults are fine)
- Once the VirtIO driver installation completes, click "Finish" and close the Terminal.
-
You should now see your network connection. Click "Next"
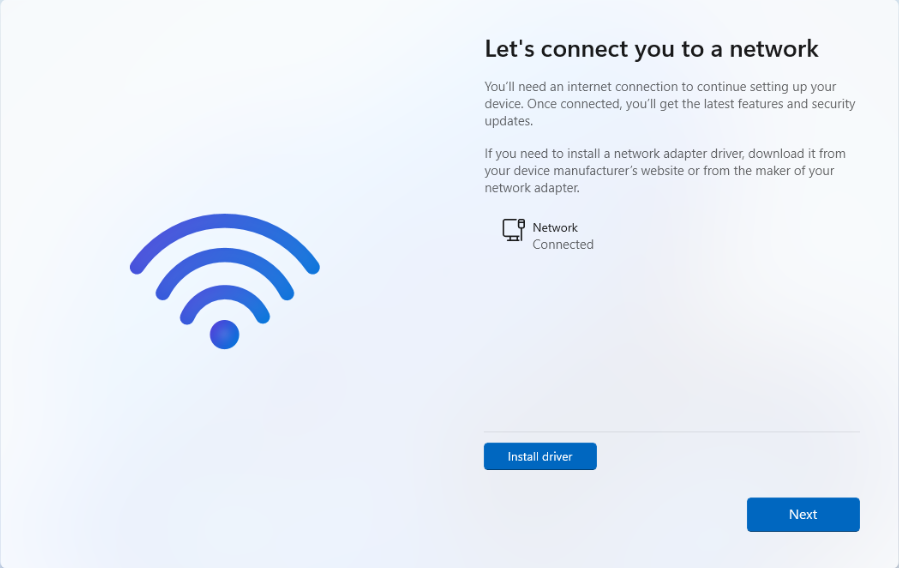
-
Proceed with the rest of the Windows installation
Next Steps
- Detach Windows and VirtIO install disks
- Once the setup is complete, you no longer need the Windows and VirtIO installation disks, so you can remove them from the VM. This will help reduce the time it takes to clone the VM. To do this, shut down the VM and then remove the disk using the hardware tab in the Proxmox web console.
- Enable RDP
- If you plan to map a GPU device to the VM, enabling RDP is required.
- Assign GPU Mapping
Troubleshooting
Windows Boot receives: "Failed to start Boot0001... Time Out"
If you encounter a similar error to the one below on first boot, then: stop the VM, ensure you are on the VM's console, and then start it again.
grafts:
- Proxmox Wiki Windows 11 Best Practices
- Hake Hardware Windows 11 VM
- gwalchemi's building vm template for Windows 11
- 4sysops' Create a Windows VM in Proxmox VE
- Proxmox Forum Virtio SCSI vs Virtio SCSI Single
- Blockbridge optimizing Windows storage performance on Proxmox 4-part series
- Proxmox Forums Why set minimum ram...
- Proxmox Forums What are the best ssd storage settings...
- Proxmox Forums Disk Case Wiki Documentation
- Joe Plaa Proxmox Virtual Disk Benchmarks